Tag Archives: Training

Didn’t your trainer teach you any manners?

Didn’t your trainer teach you any manners?

A guide to the unwritten rules of working out in a public gym

NEW YORK – Since weight loss tops New Year’s resolution lists year after year, gyms across the country are swarmed with newcomers each January. As any regular gym-goer can attest, the first few months of the year bring out all kinds of newly inspired fitness fanatics, many of whom could use a lesson in gym etiquette.

Thanks to a fed up gym regular, now we have a guide.

Bombarded by inconsiderate behavior at the Manhattan gyms she frequents, attorney and long-time fitness buff Lori Pines put down the dumbbells and wrote The Little Book of Gym Etiquette: A Handbook for Dealing with Annoying People at the Gym (January 2013, $8.95).

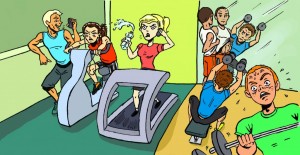
gym-treadmill-use

Pines addresses the culprits of “gym rage” among the regulars, and point newcomers to six helpful rules of gym etiquette:

1. Don’t be a slob

2. Don’t be a hog

3. Don’t be a space invader

4. Don’t be a super-talker

5. Don’t be a grouch

6. Don’t be an exhibitionist

“This is a topic every gym-goer has thought about at some point,” says Pines, who is tired of seeing empty water bottles litter the gym floor and listening to loud phone talkers barely breaking a sweat on the stationary bikes.

In The Little Book of Gym Etiquette, she cites the “3 C’s” everyone should know before a gym workout: be clean, considerate and cheerful. Following these three simple rules will, according to Pines, keep everyone in the gym satisfied.

With satirical descriptions and hilarious illustrations, Pines pokes fun at stereotypical offenders—the slobs, hogs, space invaders, super-talkers, grouches and exhibitionists—while simultaneously promoting  fitness and encouraging readers to be accommodating.

“Let’s face facts—it isn’t easy getting to the gym. You have to walk or drive there, change your clothes, psych yourself up for the pain and exertion, and then clean yourself up and change your clothes afterwards,” Pines writes. “The last thing we need is a further deterrent to getting to the gym. That’s why there is nothing more annoying than having to deal with people who don’t know how to behave there.”

LORI PINES is a lawyer and avid gym-goer who loves her daily workout and thinks everyone is entitled to a peaceful, energizing session at the gym. She lives with her husband and two athletic children in New York City.

A Quick Q & A with Lori Pines

Author of The Little Book of Gym Etiquette

What are the 6 rules of gym etiquette?

1. Don’t be a slob

2. Don’t be a hog

3. Don’t be a space invader

4. Don’t be a super-talker

5. Don’t be a grouch

6. Don’t be an exhibitionist


What inspired you to develop these rules?

This book practically wrote itself while I was working out at various gyms. All I had to do was look around, and I couldn’t help but notice many incredible breaches of gym etiquette. Some of what I saw was funny, and some was just plain disgusting. I knew I just had to write about the topic.

What gym etiquette gaffe bothers you the most?

Each of the six rules is very important, but if I had to pick one, I would say the hogs probably annoy me the most.

What is the biggest offense you’ve ever witnessed at the gym?

I see violations every day like people leaving their dirty towels and used water bottles around the gym, but the biggest offense I witnessed was a guy juggling hard rubber balls on the treadmill. He said he was trying to develop extra balance.

Are You Activating Your Glutes Properly?!

 By Eric Martinez CSCS.  When the phrase “Glute Activation” stumbles upon us, what does it exactly mean? Well, before I 578426_499793200106862_1750951167_nstart rambling on please do me a favor and sit up straight and have your booties nice and relaxed. Glute Activation is another way of saying warming up your buns or stretching the muscles in your buns. The famous muscle “Gluteus Maximus,” oh where would our bodies be without this beautiful muscle, aka our butt? Well, our glutes only pretty much help and act as stabilizers for our legs and torso, that’s pretty damn important if you really stop and think about it. The butt, which most of us treat like a vestigial bleacher cushion, isn’t just the main engine of the lower body; it’s also the steering wheel. Underneath and around the gluteus maximus is a critical network of smaller muscles: the gluteus medius (top), the gluteus minimus (lower) and a group of thinner muscles known as the deep six. Together, they surround the femur and pelvis like a rubber-band ball. And, ladies and gents when we activate these muscles properly and put them to work in the weight room, my oh my what a beauty it can become along with numerous reaping benefits to your health, daily training routine, and overall eye candy.

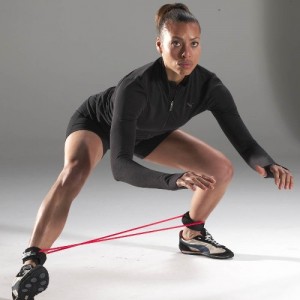
(Check out ‘Monster Walks’ for activating the Glutes!).

I hope everyone is still sitting up straight with their booties relaxed. So, how do we activate this star studded muscle? Well, this is where the two exercises “Monster Walks” and “Sumo Walks” are introduced. You might be thinking, huh? What the hell are those? These two exercises are commonly employed in Strength and Conditioning and will become more popular as time goes on. There was a study done in the Journal of Clinical Biomechanics by Cambridge et al, Sidorkewicz, Ikeda, and McGill 2012 on the effects of resistance band placement on gluteal activation during two common exercises.  The researchers wanted to understand the effect of resistance bands on muscle activation profiles during two rehabilitation exercises, called “Monster Walks” and “Sumo Walks.” These exercises involve walking in semi-squat postures in order to involve the gluteal muscles and the tensor fascia latae (TFL). So, they recruited 9 male subjects and had them perform both these exercises to see what area gave more glute activation with three different band placements: above the knee, ankles, and forefeet.

The researcher’s findings were very similar for both the “Sumo Walks” and “Monster Walks”. By decreasing band height, the activation of Gluteus Medius (top) and Tensor Fascia Latae monster-walk(TFL) were found to increase progressively. The increase from the knee to ankle for the Gluteus Medius didn’t reach much significance. The Gluteus Maximus activation was low and only increased significantly when the resistance bands were moved to the forefoot. Which is very interesting because our first instinct when trying to activate our glute muscles would not be to put resistance bands on our feet? So, what did the researchers conclude in their study? They concluded that band placements that were more distal (further from the center of the body) caused the gluteal muscles to be highly more activated than any other placement. We now know that when performing these two exercises prior to a training session that by using band placement at the forefeet will lead to greater gluteal activation, without increasing involvement of the TFL.

Time to wrap up this glute activation talk ladies and gentlemen. I can’t tell you how many people I see walk into the gym and go straight to the squat rack or straight to deadlifting without any kind of warm up or gluteal activation exercises. It is mind boggling and to this day I still can’t understand why people do it. It’s is imperative that we take 15-20 minutes to properly warm our bodies up and activate our glute muscles, remember they are the steering wheel to your lower body and they deserve to be activated. Keeping this muscle healthy, strong, active, and full ROM (range of motion) is key for a successful training protocol overall, not just for your lower body, but for your upper body and for the long run most importantly. The last thing you want to do is sustain an injury in one of your glute muscles, just the thought of it sounds painful. The society we live in today is dominated by a sedentary lifestyle and although many people are active, at the end of the day you are probably sitting on your tush for 8 hours a day to pay the bills. So, take the time to try some Monster or Sumo walks and get your glutes activated and ready for battle. Remember, you always want that booty looking better going than coming.

References:

(1)  Cambridge ED, Sidorkewicz N, Ikeda DM, McGill SM,  Progressive hip rehabilitation: The effects of resistance band placement on gluteal activation during two common exercises,  Clinical Biomechanics 2012

“No Excuses, Only Solutions”

BIO

We are Chris and Eric Martinez, the “Dynamic Duo” of Dynamic Duo Training. We are identical twins, born and raised in Santa Rosa, CA. We are Certified Personal Trainers through AFAA (Aerobics and Fitness Association of America) and CISSN (Certified International Society of Sports Nutrition).  Fitness has always been central to our lives. We have pursued a love of sports since the fourth grade, with basketball and soccer being our focal sports. In high school, we faced the loss of our father, and it made a huge impact on us. We feel it was a trial that strengthened us, but it also formed our belief that nothing is more important than health for living a long, happy and fulfilling life. Since that time, having an optimally functioning body has been a priority in our lives, which we have pursued through our study and practice of fitness and nutrition. It is a passion we wish to share with others, which is why we started Dynamic Duo Training.  Go to: http://www.dynamicduotraining.com/aboutUs.htm


Battling Ropes!

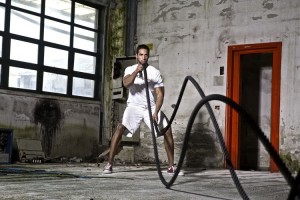
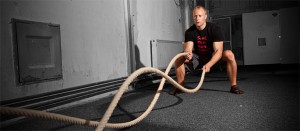
BattleRope1by Ryan Mallett USAW; FMS.  As a fitness professional, it’s imperative to stay educated and up to date with information; techniques and new equipment and its applications. Like in any industry, you will typically see something packaged as ‘new’, but has really been around for some time, leading you to believe the wheel has been reinvented. You may have seen various studio type gyms; boot camps even NFL teams and professional MMA fighters,  using large ropes being swung or whipped to varying degrees of success by their users, with “trainers” looking on and cheering for them to work harder or faster. Such ropes can be easily mis-used but were they used correctly, could really step up your fitness game. No, those aren’t ‘boat ropes’ buddy…they’re Battling Ropes!

What are these Battling Ropes, and aside from looking really cool to use, what can they do for you?  Well, if you want to know the real scoop on something, you go right to the source, and that’s just what I did. I had the honor of talking to Mr. John Brookfield (world record holding strong man known as ‘Mr. Hands’), inventor and pioneer of The Battling Ropes System, and got the low down on this amazing piece of equipment.

As a world record holder athlete, John was searching for something that could help to build and sustain power, but over time. It had dawned on him that hurricanes generate unyielding power in waves, and he determined that ‘waves’ can be produced with ropes. The Battling Ropes System was born. Within the entire system, there are seven concepts of the non-momentum style training, each system stemming from the ‘velocity + strength and speed together’ ideology. Although each system uses different applications of the Battling Ropes, simply looking for a great workout from using any of John’s systems will help you to achieve stress relief; better concentration and coordination in motor function; enhanced focus and motivation; increased muscular endurance & sustained work capacity by helping to push out lactic acid. It’s safe; anyone can do it and it’s visually motivating as well. Having used them at the Bridgewater Sports Arena here in Central NJ where I train myself, as well as varying populations of clients, people will stop to watch me make the waves and want to give it a try. The Battling Ropes come in one and a half, to two inch thick manila, or polyester styles which you can use indoor, or outside. The thicker the rope, the heavier it’ll be and the more your grip will be challenged.

metcon-kategorie-banner_1John didn’t stop there though in offering up as much information as possible about the impressive Battling Ropes System. He put me in touch with Dr. Mike Martino who is the NSCA SE Regional Coordinator and Associate Professor of Exercise Science at Georgia College and State University in Milledgeville, GA. Dr. Martino had pointed out that in studies done at his schools labs using baseball players (pitchers more specifically), “the group [using the Battling Ropes System] had less of a drop off in pitching velocity than the traditionally trained group (running etc.). Arm power also went up significantly via arm cranking.”  The relatively low impact of the BRS clearly supports effective caloric expenditure and Dr. Martino says; “It’s easy to cause CNS (central nervous system) fatigue when people use the BRS correctly, but especially when they use it incorrectly and use too heavy of a rope. If someone can’t maintain a certain frequency for 60-120 seconds straight with perfect mechanics, than the actual rope mass is too great for them. Muscular, as well as anaerobic endurance are improved tremendously when the system(s) are used correctly. Neuromuscular endurance can be improved also, which it should be noted, is different than muscular endurance.”

For the ‘average Joe’ wanting to get into amazing shape, or even the most seasoned athlete looking to break through plateaus, anyone can gain tremendous benefit from The Battling Ropes System. For more information on The Battling Ropes; any other of John’s great products or DVD’s, visit his website; www.battlingropes.com. For personal training, consultations and programs, you can contact me at ryanmallett@hotmail.com.  Special thanks to Mr. Brookfield and Dr. Mike Martino for lending their time to talk about this great training tool.


Exercises Most People Perform Incorrectly

By Molly Galbraith.

Below are four common exercises many people—even knowledgeable lifting enthusiasts—often perform incorrectly. How do I know? I used to be one of those people performing them incorrectly. I always assumed I was performing them correctly because I’ve had great coaches, I was getting good results in the gym, and I had gone over six years without injury despite training for and competing multiple times in both figure and powerlifting. In addition, having been an avid reader of articles and books by Dave Tate, Christian Thibaudeau, Eric Cressey, Mike Robertson, Jim Wendler, Mike Boyle, and Alwyn Cosgrove for years, I fancied myself quite the savvy lifter. However, after getting a little schooling from Mike Robertson last January, I learned that my suboptimal form was keeping me from reaching the next level. It was also ensuring my spot on the injured list in the future.

I was compensating for weak areas, so no matter how much I lifted, those weak areas remained weak while my stronger areas took on a disproportionate amount of the load. Since working with Robertson, I’ve learned that being mindful of correct form may force you to drop some weight from the bar at first, but over time, you’ll increase strength and performance and prevent injury. And who doesn’t want that? Without further ado, here are the exercises!

Push-up

The basic push-up—it’s one of the first exercises we learn. You were probably forced to do them in gym class or maybe you did them on your own when you decided you wanted to become the next Hershel Walker. Either way, most of us have been performing push-ups for some time now. They are simple to learn and don’t require any equipment. You can typically progress quickly when doing them on a regular basis. What if I said you’ve probably been doing them incorrectly this entire time? Blasphemy, right? “I keep my elbows tucked at 45 degrees and go all the way to the floor! My form is great!” you might say.

Well, that’s what I thought until I learned how I should really be doing them. I went from doing push-ups with a 45-lb plate on my back for sets of 16 to not even being able to execute five correct push-ups on the floor with just my body weight. Talk about humiliation!

Let’s examine how to improve your push-up form:

Chest out. Beware, this is harder than it seems. Most of us battle with weak scapular stabilizers and tight pecs because we’re constantly sitting—at work, in the car, or playing video games and watching television. In order to keep your chest out properly, you must seat your scapulae, driving them down and together. This puts your scapulae in the correct position to do their job during the push-up, which leads us to our next point.

Scapular retraction and protraction during the push-up. When you go into the bottom portion of the push-up, your scapulae should retract or “come together.” When you push yourself up, your scapulae should protract or “come apart.”

Low back neutral. This is one of the biggest issues I see whenever someone is doing a push-up. Everyone thinks she’s staying nice and tight in her core, but the truth is she probably isn’t. Get a video of yourself doing push-ups from the side and you will get a much more objective perspective of what your push-up really looks like! In order to stay neutral, draw your abs in tight toward your spine throughout the entire movement. This will take any unnecessary stress off the lumbar spine and actually turns the push-up into one of the best core strengthening exercises out there.

Glutes tight. You should be squeezing your glutes like you’re holding a $100 bill in there! Keeping your glutes tight will help stabilize your core and pelvis while performing the push-up. I know it isn’t an easy task to concentrate on keeping every area of your body tight at once, but you will gain more strength with every tight push-up you perform than you would with ten mindless ones.

Elbows at 45 degrees and go through the full range of motion. OK, this one might be preaching to the choir, but just to cover my bases, flaring your elbows out to 90 degrees is hard on the shoulders and should be avoided. If you aren’t getting full range of motion, you’re just fooling yourself. No one else in the gym is impressed with 100 elbow twitches or the physique that comes with it.

If you try to implement all these tips at once, don’t be surprised if you have to do incline push-ups for a while to maintain correct form.

Watch this Vid for Good Push Up Formhttp://www.youtube.com/watch?v=uYWUAZ1_KQ8

Lunge

Ahhh, the lunge. Revered and feared by many. There are very few exercises that have the ability to leave you as sore as a lunge. There are many variations of the lunge, but they have one thing in common—most people perform them incorrectly!

Here’s a checklist of things to think about before you perform a lunge:

Railroad track steps. Begin with your feet no more than shoulder width apart. With each step, imagine a straight line going forward (or backward for reverse lunges) from your foot as if you were walking on railroad tracks. Your foot and knee should stay in line with your imaginary tracks. If you have hip stability issues, you will find that your legs will want to drift inward or outward from the “tracks” to compensate for the weakness and instability. Even if it means dropping the weight, keep your form. This will force the stabilizers of the hip to strengthen, allowing for bigger squat numbers.

Square your hips. If you had headlights coming out of your hip bones, they should be facing straight ahead. This will get your pelvis in the proper position for a lunge and also ensure that you’re getting proper hip extension and a good hip flexor stretch.

Get tall. That means chest up, abs drawn in, and spine neutral. Pull up with your body. This will ensure good posture during the lunge and engage your abdominals more effectively. Some people tend to arch back or lean forward to get tall instead of up. To prevent this, make sure there is a straight line from the hips to the shoulders.

Squeeze the glute of the back leg. This ensures you’re getting extension from your hip, not your lower back. It keeps your pelvis stable and in the correct position throughout the lunge.

Drop straight down. Most people have a tendency to lunge forward because they’re quad dominant. Your shin should be vertical and perpendicular to the floor. This will force you to engage your glutes and hamstrings more, but it will give you a better hip flexor stretch and take some of the shearing force off your front knee.

Prevent knee cave. Keep the front knee toward your pinky toe. Forcing the knee out will engage the medial glute during the movement, providing stability and strength during the lunge.

If you didn’t hate lunges before, you will now that you’re attempting these correctly. However, going through this checklist in your mind before you perform lunges will make the movement more effective for building strength and putting some meat on the flattest of asses.

Watch this Vid for Good Lunge Formhttp://www.youtube.com/watch?v=vYmovib5Er4

Chin-up

The elusive chin-up. It’s a fantastic exercise that should be a staple of most weight training programs. It’s also one of the few exercises that can make 140-lb weaklings feel manly and 300-lb beasts feel weak. It’s also one that—you guessed it—most people perform incorrectly.

Here are some tips to get the most out of your chin-up:

Eliminate any swinging of the body (assuming you aren’t performing a kipping chin-up). There is definitely an argument for using momentum (getting more reps than normal, blah blah blah). However, in this instance, you want to eliminate swing and momentum to perform a well executed chin-up. This ensures that you’re maximally engaging and taxing the proper muscles, not relying on momentum to get your reps. If you can’t do a chin-up without swinging, grab some bands from EliteFTS and use them to do assisted chins.

Bring your sternum to the bar. Aiming for your sternum rather than your chin encourages you to pull more with your back and less with your biceps. This will also get your scapulae in that nice, seated position, reinforcing scapular stability.

Stay as tight and stable as possible during the chin-up. This turns the chin-up into an incredible full body exercise that is fantastic for increasing core stabilization.

So if you desire a strong back or you just want to accessorize a nice ass when people are watching you walk away, I suggest you remain mindful of these points as you knock out those chins.

Watch this Vid for Good Chin Up Formhttp://www.youtube.com/watch?v=ntRwFiPPl7g

Step-ups

Step-ups have always been one of my favorite exercises. I always felt like a bad ass doing sets of eight with 155 lbs on my back on a decently high box. I always made sure my entire foot was on the box and that I drove through my heel, “pulled” myself up, and didn’t jump off my back foot. I thought I had the step-up down pat. Dang it! Foiled again!

Here are a couple subtle tips that will get your legs as strong and stable as oak trees:

Drive your knee out over your pinky toe. When performing the step-up, many people have an issue with their knees caving in on the way up or down. This often happens in people with weak glutes. A good way to prevent this is to ensure your glutes are properly activated before performing the step-up. Performing a set of X-band walks, clams, or “bad girls” (i.e. seated abductions with a mini-band) are great for waking up the glutes and helping to prevent this knee cave.

Seat your glutes. The goal is to keep your hip in line with the rest of your body. Don’t let your hip jut out to the side on the way up or down. The best way to describe this is to “suck your hip in toward the middle of your body.” This will ensure maximal glute activation and knee stabilization during the movement.

If you’re having problems performing the step-up correctly, start with a much lower box and get very strong doing step-ups on it with good form. Then raise the box slightly, lower the weight a bit, and get very strong at that height. Rinse and repeat until you’re doing step-ups on a box where your thigh is parallel to the ground at the start of the movement. Then get crazy strong at that height and go karate chop your sister in the neck. (OK, not really…but I had to make sure you were still awake.)

Watch this Vid for Good Step Up Formhttp://www.youtube.com/watch?v=loJd6Wnty3A

There you have it! There are four basic exercises that should be staples of your program and tips on how to perform them optimally. Hopefully, you learned a little something from this article! And while I totally understand that there are times when it’s OK (or even preferred) not to have perfect form, any time you can improve the safety and effectiveness of a movement is a good idea in my book! Have fun and let me know how it goes!

About the Author

Published: December 21, 2010 Originally Posted in: Strong(her), Training

Molly Galbraith is a former figure competitor who turned to raw powerlifting in 2009 after some health complications forced her to give up figure. Her best lifts in competition include a 237-lb squat, a 341-lb deadlift, and a (beasty) 148-lb bench. She is also co-owner of Red Point Fitness where she runs group training classes in Lexington, Kentucky (www.redpointfitness.com). You can find out more about her group training classes at www.maximushealthandwellness.com.